Isla's first steps
Wednesday, October 31, 2007
Thursday, October 11, 2007
Tuesday, October 9, 2007
Comments on my posts
LOL I only just realised people have been leaving comments on my blog! All this time I didn't know! So Thanks to those who leave a comment :).
Zigzag & Triple Zigzag
A normal zig zag is unbroken goes from point A to B to C in 3 lines. Where a Triple zigzag does it in 3 small stitches so from A - - - b - - - c
Monday, October 8, 2007
Making it snappi-able
If you want to avoid snaps and velcro, you can use a snappi but adding some loopy material like towelling for the snappi to grab. Add this to your outter layer of material before starting your nappy. Simply cut out the right shapes & sew it onto your nappy cut in the blue area's
You may need to fiddle with it to get the bits in the best spot as I haven't tried this before. Might give it a go tomorrow just to see how it would work.
How I make a basic fitted Nappy
Hope this makes sence.
Start off with your pattern. You can make your own, or google for Free Nappy patterns. Or stretch out a nappy you have & copy the shape.

I place my elastic right on the outter edge of my seam allowance.
Now as you sew your elastic down you need to stretch it as you go. You will have to hold at the back as well & help pull the material as it sews. So your pulling the elastic in both directions so you need to help feed it through.
Start off with your pattern. You can make your own, or google for Free Nappy patterns. Or stretch out a nappy you have & copy the shape.
So First off cut out your material, you will need 3 layers. Something as your outter (Purple Cotton Rich fleece) something for your middle hidden layer, this helps to stablise your nappy (I have used a old bit of towel, see you can use your old towels & terry flats) & then something for your inner, the material that will be against your baby. I have used Microfleece. You could use flannel or anything you like really. I like Microfleece as it will have a stay dry effect against your baby.
Now you need to add your booster (absorbant bit) to what will be your hidden middle layer. I have used a booster that I cut out of a nappy which the elastic had gone in. I think it 2 or 3 layers of hemp. So put together your layers. You could use Flannel, terry flats, hemp, bamboo microfibre.
Using a wide ZigZag stitch go around your layers to keep them together. If you like you can also do a line down the centre but you don't have to, I think it just helps to stop it from bunching.
Once you have your booster, Lay it out on your middle layer of material. Place it so it is in the centre. Pin & sew it down again using a zigzag stitch. You may need to adjust your settings so go slow & adjust if need be. I would also recomend using a denim needle for this.

Now that you have added your booster, lay out your material & place your outter then your inner materials on top. BE SURE TO PLACE THESE RIGHT SIDE IN BUT FACING EACH OTHER. Pin your materials together & sew using a stright stitch. Start just at the side of the top & work all the way round your nappy & stop before reaching where you started. You need to leave a opening big enough to turn your nappy right side out.
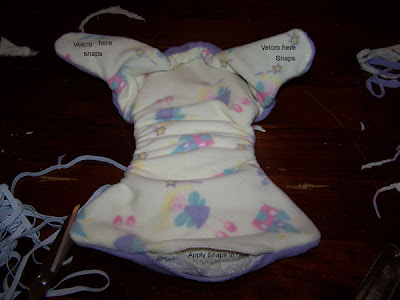
Once this is done lay out your nappy & place marker pins where your elastic needs to start & stop. Its hard to say exactly where you should put these, use a nappy you already have to get an idea. I have marked the picture above to show where I put them. At the bottom of this pic also shows the opening you need to turn it rightside out.
Now applying the elastic. I use a 6mm braided elastic. Place the end of your elastic (I don't cut to length.) at the top of your first marker (I do the legs then the back but it doesn't really matter what way you do it). Using a zigzag stitch at about the middle width your machine does (mine is 3) tack the elastic down by doing a small (half a cm) back & forth of zigzag. Now make sure your needle is up & change your setting to the Triple Zigzag & to the widest setting ( a triple zigzag is the stitch that instead of having 3 points it has 3 points in one line so it goes - - - does that make sence?)
I place my elastic right on the outter edge of my seam allowance.
Now as you sew your elastic down you need to stretch it as you go. You will have to hold at the back as well & help pull the material as it sews. So your pulling the elastic in both directions so you need to help feed it through.
When you get to the next marker, switch back to the smaller zigzag stitch & tack down the end same as you did at the start. Cut your elastic & repeat for the other 2 sections.
Now you add your snaps. I place mine so there are not exposed on the inside of the nappy by putting the cap insid thepocket opening through the middle & outter layer. Snaps or velcro can be added before sewing your nappy together but I find it easier this way (for snaps anyway).
Now to close & top stitch. You can use any stitch you like for this. I find ones that allow for some stretch work best. for this nappy is just did a small zigzag.
Now you should tuck & pin your opening before you sew but I am lazy & just tuck it in as I sew.
Work your way round the nappy & when you get to where there is elastic (will have to feel for it). Stop & lift your needle & swap to a triple zigzag. Lower yyour needle & lift the presser foot, gently turn your nappy slightly so your sewing towards the middle of the nappy. lower your presser foot & slowly curve round so your parrell with the edge of your nappy but have a nice gap for the elastic. You need to have it wide enough so that your topstitch doesn't catch the elastic or seam allowance. As you sew along here you need to stretcg out the elastic as you go, just like before hold the front & back pulling it but guiding the nappy through(practice makes perfect).
Once you are back where you started your done! All thats left is to apply your snaps or velcro to the wings & the velcro to the front.
A few thing to remember. The thicker your materials the stronger the needle you will need. Denim needles work well.
You can do the same thing but make it a pocket nappy by skipping your middle layer & using a good waterproof layer as your outter (PUL, 2 layers of Polar fleece that you get from Spotlight or 1 layer of good Malden mills fleece.). Leave your opening at the top where your back elastic will go rather then the front when you first start. Feel free to email me if you don't understand what I mean. Or even make an AIO but making your otter a waterproof layer or adding it as a hidden layer.
I never had any luck sewing velcro, my machine just doesn't like it. But I belive a zigzag stitch is best for sewing it on, but your best to practice on some scraps to get it right for you & your machine.
Ballpoint needles work best for fleece materials.
There was something elae to but I can't remember...
Now I remember. You could use less layers in your booster bit & then add a lay in booster when it being worn. To make a lay in booster simply get some more of your absorbent materials & makea long rectangle, just like you did for the booster you have sewn in your nappy. I like to make them twice that length so I can fold it over & have a thinner booster for drying time but when in use its doubled over. So once you have your absorbent layers add some of your inner material (microfleece in my case) & then some of what you used as your outter. Add them so you have a top & bottom that matches your nappy & do a nice zigzag right around & there you go, a matching lay in booster.
Well anyway, there you go. Thats how I make a nappy. Was that easy enough to follow?
No more cheeky Monkeys Jumping on the bed!
FLUFFY MAIL!!!!!

Kozy Designs Soaker. So cute. I will take a pic of Isla wearing them but they are being lanolised at the moment but here is the pic off the website where I got them (http://www.theenchantedpond.com )

Saturday, October 6, 2007
Here Fishy Fishy Fishy
Well here is a blast from the past. I made this Vest back in Highschool, mmmm year 9 to be exact. It was a project for design & tech. Its made from Silk which was white & I hand painted using silk paints. The inner is taffita (think thats what its called anway).

But yes here it is, one of my first sewing creations. Actually except I am not sure where it is right at this moment (in the middle of packing to move) I do still have the first thing I ever made on a sewing machine. It was a dress for my doll. I would have been 10 or11 I think when I made it. I also have the dolls I made for my major in year 10. I did a 5 decade timeline of clothes so I had 5 dolls all that I made & each one wore clothing that I again made that was fromt eh 50's 60's 70's, 80's & 90's. I am pretty sure I gave 2 to my sister, the 70's & the 90's i think. Or maybe I never finished the 90's one. Anyway once I have them out I will post a pic of those too.
Here is the Vest. It really needs to be ironed but anyway..

When is was Finished I remember our class having to get up in front of the whole school to show our work. I was very embarrised when the headmaster held mine up & said she would expect to pay upwards of $50 for it. Mine was the only one she pulled out & made point of. So a proud moment but I was embarrised none the less.
Wednesday, October 3, 2007
Look at these!
Ulyssses Jewel Shorties I got from buy for baby. Very cute & I got them super cheap!

Also check out Isla using the potty! at just 10.5 months she uses the potty for poos! Mind you she doesn't actually ask to go potty but I can tell when she needs to as she doesn't like to poo in her nappies. Yopu can tell what she is up too by that classic "busy" look on her face lol.


Also check out Isla using the potty! at just 10.5 months she uses the potty for poos! Mind you she doesn't actually ask to go potty but I can tell when she needs to as she doesn't like to poo in her nappies. Yopu can tell what she is up too by that classic "busy" look on her face lol.


Subscribe to:
Comments (Atom)





+of+F1000006_0001.JPG)


